About Me

My photo
I live in the Black Hills of South Dakota with my husband Bill, 3 sons, 2 dogs,, 2 horses-now 1, bottle calves and Chicks. I love to Quilt. I enjoy Horses,Gardening, Flowers, Archery, Camping, Fishing, Bottle Calves and all things with animals. I started sewing when I was 8 for 4-H, and have sewed off and on since. I discovered how fun quilting was over 7 years ago. I still sew on a Kenmore that was a graduation gift in 1981. I have a New Kenmore 385.19, and a Viking 400, a Singer Treadle, a Featherweight. and a Viking Ruby. In February 2010 I purchased an APQS Longarm , and Love everyone of them. I taught my 1st paper-piecing class, it was such a blast!

Tuesday, October 26, 2010

Farmers Wife Blocks 17 & 18

I have managed to complete 2 more of the Farmers Wife Sampler Quilt blocks in both the 3" and the 4" sizes that I am doing. They are #'s 17 and #18. The #17 was a bit of bugger for a bit. Finally went back in my EQ5 and redid the sections on it and it came together very quickly. The way it wanted it done originally it would of had a set in seam for one of the little tiny triangles, they whole piece wasn't more than 1/2" total so decided my fingers or brain wasn't up for that. I'm happy with how it turned out now.


3" -Block #17 Cats and Mice-3o's prints


4" Block #17 Cats and Mice- Scrappy fabrics


When I first started these blocks and was deciding which size I wanted to do this next block is the one I chose to try thinking it would be one of the hardest ones. It is a 3" Scrappy and is called Century of Progress. Since then, I had decided to do my 3" ones in the 30's fabrics and the 4" in the scrappy fabrics so this one will just be my extra. Then I had forgotten that I had already started and cut out another 3" 30's fabric so ended up finishing both of them. Soooo... I will have an extra one of them too. I am not happy with my center points on any of them not matching so will be eventually taking parts of them apart and redoing, but that will be another day.


3" #18 Century of Progress- Scrappy


3" Block #18 Century of Progress- 30's fabric


3" Block #18 Century of Progress- 30's fabrics


4" Block #18 Century of Progress- Scrappy fabrics


The group (Quilting Board on the internet)I am doing these with are on blocks # 24 and 25 I believe, so I have fell behind a touch but the next few are pretty easy so when the time becomes available I should be able to whip them right up.


This last weekend we also made it down to Edgemonts' "Nuts and Bolts Fabric Store"and picked up my prizes so will get pictures of them and get them posted too. Earleene and Jerry are in the process of fixing up the Class Room, painting, lighting and all it is looking Wonderful! If you are ever that way be sure and stop and check it out.


I am not sure what's happening with the Wisconsin Quilt Blocks on Barns, so I think I will be starting Sylvia's Bridal Sampler. I think I have decided which fabrics to use so will decide for sure and will let you know and get movin' on that. (There are a few who follow this blog that are not on as Official followers so wanted to let them know I just haven't stopped them)

Well, I hope this finds everybody happily stitching! and able to be in where it is warm. Our cool weather has hit today, we have had Sunshine, Rain, and the litte white sleet snoballs so we know it is close. Usually we have our First Frost by September so we have been a little spoiled with this warm weather yet. I usually leave my pumpkins in the Garden til after the first frost soooo....maybe we will get to pick them this week.
Have a WONDERFUL WEEK!



Tuesday, October 19, 2010

Fan tastic quilt with the 60 degree ruler/regular ruler

Here are the directions in how I cut my triangles for the "Fan"tastics table topper. You can either use a regular ruler that has the 60 degree marking or a 60 degree ruler.(Picture A)
These first two pictures are of using the regular ruler with the 60 degree marking. After sewing your four strips together you place your ruler as shown to make your first cut.You're putting your 60 degree marking at the top edge of your 4 piece Fabric strip and then make the cut. Then you flip your ruler over so the 60 degree marking will be on the bottom of your fabric as in "picture B". (You are getting two different color triangles out of one strip set)
(Picture B)

This next set of pictures is using the 60 degree Ruler. After you have made your 4 piece strip set lay your 60 degree ruler as shown in "picture C" Putting your point on the edge of fabric. Then you flip your ruler over where the point faces the opposite dirction as in "Picture D". You continue on flipping and cutting your angles for all your strip pieces.
Then comes the "FUN" part of arranging them until you find that "just right" for you design.
(Picture C)

(Picture D)
I hope this hasn't confused anyone, and that it helps in cutting with the regular ruler and the 60 degree.
You could do bigger strips, instead of 1 1/2" use 2" or 3" or even smaller.
The possibilities are endless!!
Have FUN!
Judy


Froggy Quilt and More Feather Meandering

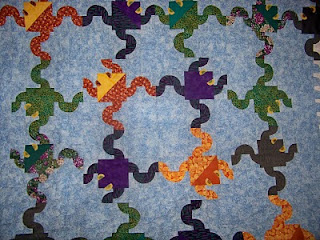
Froggy Quilt
I was given this to quilt for Project Warmth and think it is just adorable. For quilting on it I just did a Stitch in the Ditch around the frogs and an all over meander so it wouldn't take away from the design.


Back close up of froggy quilt

Front closeup


This is My #38 Project Warmth Quilt. On it I did an allover Feather Meander. I just love doing feathers they are so elegant looking.

The back of the above quilt showing the feather meander.

Close up of the Front

Close up of the back with the feather meander design.
I am headed to take these and the last 6 project warmth quilts that I have quilted to the meeting today to hand in.
It looks beautiful outside so hopefully will get home from town soon enough to enjoy some of this weather.
Have a Wonderful, and Inspiring Day!!


Saturday, October 16, 2010

Lady Bugs and Big Flower Meander

What A Beautiful Day!
This is my Project Warmth 35th Quilt that I have quilted for them. It was so cute I did not want the quilting to take away from the design, so I just Stitched in the Ditch around the lady bugs and did an leaf meander all over in the Green Superior thread.
Back of the Lady Bug Quilt

Close up of the Leaf Meander and Bugs

Close up of the Back of the Lady Bug Quilt

This brings us to this one. This is another Project Warmth Quilt (#36) .When I first received this one the batting was too small, the 2nd time the backing was too small, and the third time the backing was still too small. Well, we finally got it together and I think it turned out really pretty. I did an Big Flower Meander all over it. It went quite quickly or (maybe it was one of those days where things just go smoothly) hee hee.

The Back, almost looks like stain glass thru it.


Close up of the front and the flower meander.
I have a couple more to work on this weekend then I am in hopes of getting back to my Farmers Wife Blocks and the Wisconsin Barn Blocks, and have "BIG" hopes of really going back and picking up my Nevada Star Quilt and working on it. I had started it back in February and then with the hospital stay of MIL, and Mother I have just never gotten back to it. Soooooo.....here's hoping......................
Well, Once again I hope this finds you well, and Happily Stitchin...... May your weekend by BLESSED!!


Thursday, October 14, 2010

Wandering Daisy's

Here is my Project Warmth # 34.
I quilted it i in a Wandering feather/Daisy design. It actually quilted up quite fast and neatly.

Here be the back...
I like looking at the backs of quilts. Sometimes you just get a different look to them.
I don't know why the batting looks purple in this picture because it really is white.

Close up of the back


Close up of the front wandering feather/daisy design.
I quilted it with a light lilac (it appears white here)because of the lilac leaves Fabric.


Wednesday, October 13, 2010

"FAN"tastics Table Topper DONE!! Casey and more

This has been a Crazy, Busy, Everything Week!!

I had to start this post with a picture of My most "Favorite" Cross Country Runner. This is Casey about half way thru the course. They run about 1 1/2 -2 miles at their meets. He has one more meet left for this school year. "Go Casey Go"


This next picture is Carl and one of our this years bottle calves. We shipped calves yesterday, now normally we don't get toooooo attatched well as you see by this picture somebody did!But look at the next picture........
Yes , Carl had her halterbroke and he could sit on her she would carry him around. A little insight in to the calf. She came to us after her mother had died due to prolapse (long story short, her insides came out), the first couple of days was touch and go with baby. One day she was just laid out all but alive. A friend of ours came and gave her a shot (we had tried everything we could think of) and was down to just keeping her moving to keep her body parts working. Well the day she was given the shot, we really did not think she was going to survive the next hour let alone the next 5 that she did. 5 pm that night my hubby and I were out on the hill raking pine cones( every so often we'd go pick her up get her to take a step up until this point) Carl came out of the house ran down to her she jumped up and chased him....... and never stopped from that point. ......
Soooooo........ shipping day yesterday was tough on these two but as we all know you can't keep them all.(I'm going to surprise him with a blow up of this picture and put it on a tshirt and give it to him when he gets home tonight....
LOVE.......Buddies.......

After a couple of weeks working, disposing of and reclaiming, this table topper is totally done. I have to admitt I do like it and love how the brown binding just really adds to it. Thank you everybody that gave me an opinion on it!
For the quilting I did lots of Stitch in the Ditch from the center of each star out and then knocked the background down with some micro meander all over puzzle.
The back looks pretty cool too, but didn't seem to show up well in my photo.
Here also is my #32 Project Warmth Quilt. I also out the binding on this one.
The back of #32
I have a few more PW's to get loaded and done, but this week is promising to be another BUSY one! Between meets, meetings, sales, and calves....school and more....... Oh.. and the Tahoe is taking a break and being looked into.(it's dashboard lights decided they were tired somethimes)
Such is life,
May your week be full, fun, joyful and peaceful!!


Wednesday, October 6, 2010

Quilty Days and more-Bug Jars,"Fan"tastics Star, Project Warmth, Farmers Wife

This has been a Busy Quilty Week and a Half!
but, I have also managed to get tons more done around the house too. Including painting the Facial Board, Trim, and Soffits all around the house and three doors. I still need to paint the door jams but figure this afternoon I will wonder out and do that little chore.

As for Quilty things here......... are a few I have been working on.......

These are my 4 1/2" and 3 1/2" Farmers Wife Blocks # 14 Butterfly of the Crossroads Week 7
(please excuse the blurry picture)
Then I loaded and quilted this project Warmth Quilt and is my number 30th! Whew hew!

This is Pat's Block, She is in the Hot Springs Quilt Guild that I belong to and won the monthly block drawing. She requested a "Thimble Block" in blue's or Maroon. I paperpieced this block, it is the only one I could come up with that even looked close to a thimble.

These top blocks are another block of the Farmers Wife and in the 4 1/2" and 3 1/2"Sizes they are # 16 and called the Calico Puzzle.

These two are also Farmers Wife Blocks and are #15 and are called Buzzards Roost, and also in the 3 1/2" and 4 1/2" sizes.

Here is my "Fan"tastics Table Topper. You may remember this from when I thought I was going to put in a pile for the FUFO list "Forever Unfinished Object"(actually it was for a day).Well, I put it on the longarm Monday and this is what it came off looking like. I really wanted the stars to stand out, so I stitched in the ditch around the diamond shapes and then did a freehand very small meander puzzle type thing to knock down the background. I think I want to try putting one more stitch on it(to get rid of the poofy part of the star) so will use my smaller machine. Then I need to decide whether to go with brown binding or the dark teal print for binding?? So any suggestions on what you think the color of Binding should be, feel free to mention your thoughts!!
I have decide that I really like this top so am anxious to get it done and bound to put on my table.
Then this one I actually had on the long arm before the one above. It is my project Warmth #31.
With this one I stitched in the Ditch around the bug jars and then did a Freehand big loopy thing all over. I have another one of these to quilt and am planning on doing an allover bug design on it. I think they are just adorable!
Here is the back of the Bug Jar Quilt.
And a close up view of the loops and stitch in the ditch.
(Don't look to close at the Stitch in the Ditch is was my first Time on the Longarm of this magnitude and it was kicking my Butt!) (I have been avoiding SID like the plague) It had a very thick batting too! My seam ripper really had a workout!!
All in all It has been a busy Week and a half, but full of Fun!
I am SO ADDICTED TO THIS QUILTING!!
Well, I better get going and get some more things done. I hope this finds all happy, at peace and just enjoying LIFE....................
Judy